Follow the pattern page link above and print a copy of each .pdf file listed there for Lesson One.
Fabric choices:
Paper Piecing: Doing it Backwards If you are a beginner at paper piecing, you should know that there are almost as many variations in technique as there are people to tell you how to do it. Don't let my or any one else's directions confuse you--just try various methods and see which suit you best. And, as always, feel free to bring your questions to the Discussion Forum. If you are familiar with paper piecing and want to place your fabrics on the back of the pattern and sew from the printed side, you can do all your blocks that way. But I hope you will try my backward approach to things, at least for this lesson. Actually, I designed a couple of the patterns for this quilt before I had ever made a block with paper piecing techniques (although I had read a set of directions.) And then when I did make one, I didn't go back and look up the directions--I just made it the way that seemed natural. Later, I realized that I was doing it "backwards." I would probably follow traditional directions if I were making a pattern that required precise corners and matching seams. These blocks, with a couple exceptions, are designed so they DON'T match or require perfect points. The directions for future blocks will assume "sew and flip" piecing. For me, it is a more creative approach because it allows me to see more clearly how my next fabric patch will relate to what has already been added. Feel free to use whatever style of paper piecing you wish. The blocks will work either way. If you have ever made a Log Cabin block or done "sew and flip" crazy piecing, then you already know the basics for making a random rose. I will give this first set of directions in considerable detail--just in case--but will simplify the directions for succeeding blocks.
|
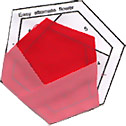
| Random Rose: Step One Use the "Easy Alternate Flower" for your first try. Cut it out of the page. I prefer to leave an eighth inch or more beyond the seam allowance (but that's optional). Fold back on all the inside patch lines (but not seam allowance lines). If you are familiar with origami directions, this will make "mountain folds" on the printed side and "valley folds" on the unprinted side. Let your folds go clear across the paper because they will help you determine when to stop and start a seam. |
 |
|
Step Two: Rough cut a chunk of fabric that is at least 1/4" larger all around than Patch 1. You can hold the fabric and paper up to the light to be sure if you need to. It pays to be generous! Pin this patch to the printed side of the pattern (we're doing this backwards, remember), covering Patch 1. You can also hold it in place with a dab from a fabric glue stick. Unless the patch is very small, I prefer to stick the whole thing under the presser foot and run a few basting stitches down the center of the patch. |
|

| Step Three: Adding Patches Take your strip of fabric and place one edge of the strip so it matches the edge of Patch 1 that borders Patch 2, right sides together. Let it extend beyond the edges of the previous patch by at least a quarter of an inch. Then sew a quarter inch seam along that edge using the cut edge as your guide. Try to stop and start your seams just a stitch or two beyond the adjoining seam line. The next seam will go over this to secure it, but I usually leave about a half inch of thread tail for extra security when I cut the threads. Give this seam a quick press, then flip it open to cover Patch 2 and press just the seam again. Put a pin in close to the seam if the patch is large or your fabric doesn't want to lie flat. Just be sure it is away from any future seam lines. |
 |
Step Four
You will have extra fabric dangling. Turn the block over. Fold the pattern paper back along the seam lines that surround Patch Two. Trim off the extra fabric, just as you did with Patch One.
|
Step Five: Patch Three Place an edge of your strip along the edge of Patch 1-2 that adjoins Patch 3. If you aren't sure of your guessing on size and positioning, place a pin in the seam line, then flip the patch over to see if it will fit from that position. Hold it up to the light if necessary. Be sure you allow a generous seam allowance beyond the edges of Patch Three. Continue adding patches, pressing and trimming until you have gone around the entire block. We started with the simplest patch. Some of the other flowers on the extra page contain more patches but the procedure is exactly the same. If you are a beginner, you may want to save the two part block for later. |
|
| Remember, I said you couldn't do this wrong. I will modify that statement just a bit. If your trimming is slightly more or less than 1/4" or the angle is a little off, it won't make a particle of difference in these finished blocks. Just be sure that you sew a straight seam when you add a new patch. That IS important. However, it doesn't have to end up exactly on the line I've drawn for you. |
When selecting fabric for a new patch, I usually try to chose a slightly contrasting area along that edge, but it really won't matter too much because the lights and shadows on a flower are determined such things as the angle of the flower, where the sun is, and whether part of the flower is under the shadow of something else. As long as the "body color" of your fabric and its value (lightness or darkness) is reasonably related to the center patch it will work.
The beauty of working with a batik type fabric is that there are usually enough variations to give the patches some distinctiveness (which you can enhance with quilting if desired) and at the same time allow you to use the same fabric for the whole flower with only a small amount of fussy placement if needed.
|

 |
I made the first three in plain fabrics in two or three values on purpose so that you might be able to see the seam lines more easily. The final flower uses a batik fabric. Which version do you think will blend into its background more easily--if that is what you want to do.
Please don't judge these flowers--or even these blocks just yet. You are seeing them alone. In the quilt they will become part of the garden and will be as obvious or as secretive as you make them.
My personal preference is to use low contrast prints or batiks for rose type flowers, more contrasty prints for the "Stack'n Whack" style flowers and plains or prints for the "petal" style flowers that you will see in later lessons.
Each of these flowers above is made from a slightly different version of the block. There is no one "right" look, so relax and do your own thing.
Cut one of the Random Rose background blocks from your printed page. They are drawn with quarter inch seam allowances, but allow another quarter inch extra around the outside where you can. (You will trim them to size later.)
Pin, glue or baste one of the flowers in place on the pattern. Then add your background and leaf fabrics, in order, around it. Use the same flip and sew technique as you did in the flower.
Remember that value and color changes are what will make the most distinction between patches. If you visualize this block in as being in bright sunshine, you will want to use sunny colors. Or perhaps the background is in shadow with only one or two of the leaves and the flower illuminated by sunlight. Start with your flower and just build a mini scene around it.
Once again, don't judge your block at this point. Just lay it aside and try something different for the next one. The real test of a block will come when you begin to fit them together. There will undoubtedly be a place for it somewhere in your quilt. If not, you can either change the block or create a place for it.
When we were making the "My Ozark Garden" guild quilt, people kept asking, "But what is it going to look like?" And I had to tell them that I wouldn't know that until I started to put their blocks together. They were a bit worried, I think--but I wasn't.
Now for a change of pace, let's go on and make some leaf blocks.
Next