Working with an approximately 2" wide strip of fabric, work your way around the sides of the center. Always add fabric at a slant so that the seam lines are never exactly parallel. Trim excess fabric as needed. Keep in mind as you trim that you need to create a new straight line for each new seam line you are creating on the outer edge of each patch.
This is just like doing a Log Cabin block except that you are free to break all the rules and invent as you go!
You do not need to fill in the corners with leaf fabric if you plan to insert the flower into a larger block. Trim the flower to a shape with any odd number of unequal sides. Be careful to avoid creating parallel edges and right angles--these will catch the eye. You must allow for seam allowances as you trim, so do not trim too close to another seam.
Or you can simply pin the flower in place and shape it as you add the rest of the block. The extra fabric will be trimmed off as you go.
You may substitute any random rose shape in any of these Ozark Garden patterns. Simply pin it in place and fill in around it as you did in the Random Rose block. Remember, you do not have to sew on my pattern lines.
If you want this to be a short block on its own, start with the 4 1/2" paper and fill in the corners with background/leaf fabric.
"Stack 'n Whack" Style Flowers |
 |
Small "Stack 'n Whack" hexagons or octagons make great flowers for inserting into a larger block. An equilateral triangle about 1" to 2" high (or larger, if you wish) is the easiest template. Personally, I prefer octagons and use a triangular kaleidoscope template.
You can fussy cut these or, if you are already making "Stack 'n Whack" style blocks, simply cut a bunch of these in various sizes from the scrap areas. Pin each stack or tack them together with a few stitches until you are ready to sew them. They make great carry-along work for hand-piecing, and now that you've gotten started on this kind of paper piecing and know how to insert them into a block, you can find lots of use for them in other quilts as well. And, by the way, they don't have to stay a perfect hexagon--you can trim them to odd shapes to fit a block. After all, things do overlap in a garden.
When you sew them for this quilt, don't worry too much if the fabric pattern doesn't quite match exactly or that the centers aren't quite perfect--flowers aren't always perfect either. You can always applique a center, or camouflage it with some creative quilting lines. The flower needs to lie flat, but that is the only perfection I worry about for a "garden" quilt. (Hmmm--come to think of it, They wouldn't have to be flat. You could add some 3-D details or even whole flowers, or stuff a "puffy" flower with a bit of extra batting.) On the other hand, you are, of course, free to be just as precise as you chose.
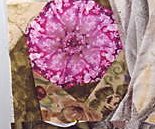
The little illustration below is from the original "My Ozark Garden" quilt that was quilted by Peggy White. You can see how she created a center for the maroon blossom with golden yellow stitching.
Petal Play |
 |
You can fussy cut these segments or just piece them randomly depending on your fabric. Sew the two "half" sections together and insert into any block.
In Ozark Garden II (to begin January 15, 2001) I will give you a complex block that uses this approach to make a cluster of small blossoms. For now, I will just tell you that you can shape each of the "petals" as you paper piece them, using a technique we will use with leaves in Lesson Two. Experiment with this idea as you have time and be prepared to share your discoveries in that class.
In the meantime, don't forget to visit both the class Discussion Forum and the Gallery to see what else is happening.
Back