Playing with Maze Design
- follow-the-path mazes which we will use in this class as pieced quilts and
- over/under designs which could be appliqued or, sometimes, pieced.
Note: Designing on the computer(Windows Paint TM works very well) is easiest because things are so easily changed. If you are working with pencil and paper, you will want two colored pencils and a good eraser or tracing paper. Graph paper is useful but not required because mazes don't have to go in straight lines.
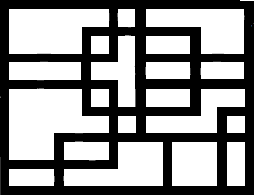
Step One: Construct the Foundation
Draw a series of overlapping, unfilled boxes. Remember that this is a maze and you are creating rooms and/or passage ways to be explored.
- Leave spaces between your boxes where they overlap (think of secret passage ways) or else snug them against a previous edge.
- Keep the "rooms" a reasonable but interesting size (think closets or hidden vaults as well as "Great Rooms".)
- Odd shapes are OK. They add interest and make it necessary to explore to find the next doorway.
- Look at the design as a whole. Is it cluttered? Off-balance? Too much the same? That's what erasers, undo buttons and new files are for. Save this file.
Step 2: Create the Solution
With a different colored line (red line, below), draw a wandering path through the maze, entering no more than one third of the rooms. Go right through the walls like a ghost. Obviously, the more complex your foundation, the more involved this travel pattern can be--and the more difficult the maze. Save this file under another name.
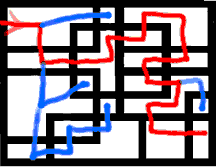
Step 3: Complicate the solution
With a third color, make paths that wander through the rest of the rooms and passageways. To keep things more interesting, branch off from the solution path somewhere near the beginning and at intervals anong its route. Every choice offered makes the maze more interesting.
Set your own rules. For example:
"A room may be entered only once."
"If a path comes to a dead end, start a new path."
"Going in circles is OK, so you may enter a room more than once.
Save again, under another name.
|
Step 4: Create the Maze Paper: On a new sheet, trace the walls of your maze with a thick marker, leaving gaps anywhere a line goes through a wall. Computer: Erase (or fill with white) all the colored path lines, making a gap in the wall where the the path goes through it. Your maze is now complete. |
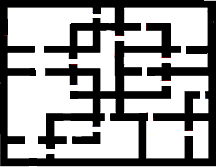 |
Take another look at the maze above. Notice where the path seems to go across some rooms in a straight line? It would be more interesting if you offset these doorways.
Do you want to subdivide a room or add an addition to this floor plan?
Does your solution path still work?
Go back to your original file and play some more.
Exercise Three: "Hose" Mazes