Stringing Beads | |
|
In this lesson we will experiment with layouts and ideas for using the "bead" blocks you have been making.
| |
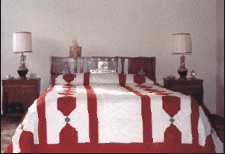 This was the second quilt I ever made. I've re-designed it so the beads are no longer on the bias and the beads can now be made various sizes (the bead strip module.) How much I have learned since then! | |
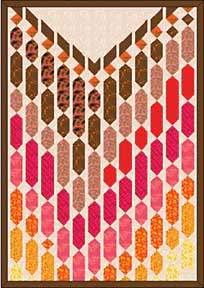
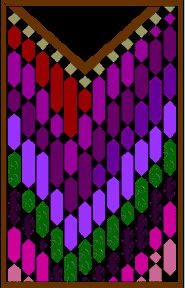
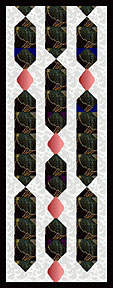
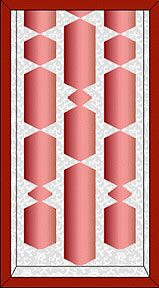
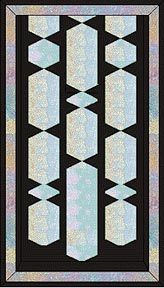
For example, a pattern made from just two bead styles/color would be designated as an ABAB or as a BABA pattern. A pattern using a three bead repeat could have several variations to be repeated: ABCABC, ACBABC, BACBAC. The repeat can be flipped or reversed--ABCBA--or combined with other types of repeats. The more beads in your pattern, the more possible combinations there are.
The pattern repeat can be symmetrical (same on both sides of the center), asymmetrical or random. The repeat can be varied in terms of color, size or style. Look at the bead strings below and see if you can identify a pattern for them.
![]()
![]()
![]()
![]()
![]()
![]()
![]()
Just for the fun of it, if you have IE4 or newer, you can play with bead patterns online. Click here.
Click here for a page of bead patterns you can print out and play with colorings.
A design wall of some kind will be a big help in planning layout. Pin your blocks on your design wall, alternating with strips of your background if you know the width you will need to cut. Re-arrange until the design pleases you and then sew the bead strips together. Because you added expander pieces as you were making the beads, they will all be the same width. Taking photos will record possibilities.
Tip: It can help keep things aligned if you pin matching tape measures to the top, bottom and/or sides of your design wall. Add string or snap a chalk line across and up and down to mark whatever divisons you will need.
When your pieced strips are separated by wide sashing, it is always a bit of a hassle to keep the individual blocks in alignment across the quilt.
A random arrangement of beads in the strips is easiest to piece because you don't have to worry about matching anything. Just be sure that you like the arrangement and then trim the extra fabric beyond your boundary tape measures before sewing the strips together.
To ensure that your beads are in alignment across the quilt in a symmetrical arrangement, start in the middle with the center strip (whether it is a bead strip or sashing) and sew on the adjoining strip. Then with a ruler or by folding and creasing, mark a matching point on the unsewn side of the sashing strip for each bead seam. Sew the strip on the other side of center, matching the marks with the bead seams. Work outward, adding a strip at each side as you go.
Another approach is to start at one side and set bead strips and sashing together in pairs and mark the opposite edges. To complete the sewing, sew the pairs together, working from the center out--this gives a shorter distance in which to get off of square.
We haven't even mentioned embellishment possibilities, like a bit of extra batting under each bead to give them more dimension, or separating a row of beads with wedge shaped patches to make the string curve for a scallop. Explore possibilities when you think of them, make up a bead or two with extra fabric, use fabric samples--keep beads in mind and you'll have the makings of another quilt without even worrying about it. Have fun!
 |
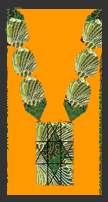 Select your most elaborate and/or largest bead and hang it as a pendant. Note that a partial bead "hangs" the string at the top. |
 |
Back to Lesson One