©2000, Lily M. Kerns
|
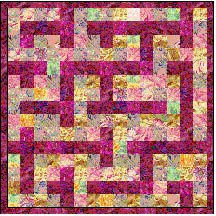
These directions are for a 40" x 40" play quilt. It uses twenty-five 7" blocks in a 5 x 5 layout, plus a 2" border and the binding. The block is a quick piecing variation of a 9-patch, with a T coloring. You can make the blocks first and then plan the maze or plan first and then custom make blocks to fit your plan.
|  |
| If you are a beginner and need more help with any of these steps, be sure to ask your questions in the Discussion area for this class. You might also check in the library to see if the information you need is there, but be sure to ask if you need help. If you have EQ4, you may download a zipped .pj4 file (15K) which includes blocks for lessons 2-4. |
|
|
Fabrics 1Ĺ yard of non-directional fabric for background. 1 yard contrasting fabric for "roads" (referred to as "dark", but the contrast can be reversed.) Backing: 1ľ yard; batting (use a very thin batting for a play quilt). |
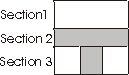 |
Section 1 and 2 Cut TEN 3" strips across the background fabric. Cut TEN 2 Ĺ" strips across the dark fabric. 1. Sew one light and one dark strip together. Make five light/dark pairs. Press seam open (or toward darker fabric if desired.) 2. Cut into TWENTY-FIVE 7 Ĺ" segments. |
Cut FOUR 3" strips across the background fabric.
Cut TWO 2 Ĺ" strips across the dark fabric.
1. Make two strata, sewing light/dark/light strips together.
2. Cut into TWENTY-FIVE 3" segments.
| Construct each block, adding Section 3 to the dark side of Section 1 and 2. | |
Arrange the blocks as desired (see below).
After the layout has been made and the blocks sewn together, cut FOUR 2Ĺ" strips of dark fabric and add a 2" border around the blocks, sewing them to the top and bottom, then to the sides.
Add backing, batting and binding (cut from remaining dark fabric). Quilt in the ditch, or as desired.
Again, be sure to ask if you need help.
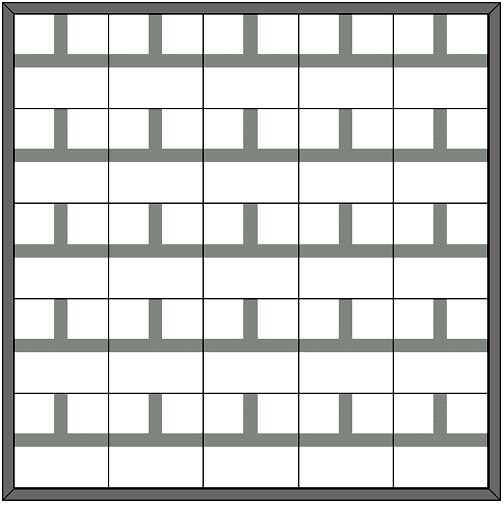
Planning your maze
This quilt is a "Road Map" maze. The "T" part of the blocks will form the roads that wander through your maze.
Lay out your completed blocks, rearranging and turning them until you get a pattern that is both visually appealing and provides a continuous, but winding, path from one edge of the quilt to another. If you wish, appliquť a small star or other marker to indicate the starting and/or ending points.
You may wish to create a single "destination" or there can be many possible solutions.
Option:
Print the planning diagram below. Separate the T-blocks and arrange as desired. Then recolor any segment you wish to change for a more interesting path--e.g make a four-way corner, or cut off one end of the "T" to make a curve that offers no choice of direction. Make those re-colored blocks separately. This will be more work, but gives more design control.
If you have EQ4, you may download a zipped .pj4 file (15K) which includes blocks for lessons 2-4.
Because of the seams in the middle of the open spaces, the T-block quilt does not lend itself to directional fabrics. Lesson 3 will guide you through planning a maze quilt that can use theme fabrics as a background. A farm quilt, for example, with a landscape fabric for the background, offers plenty of space for parking toy tractors and penning plastic animals-- perfect for imaginative play. Or you could make it a zoo, jungle or space quilt, depending on your choice of fabrics.
These quilts will use a sashing technique to create the pattern of the maze.
Lesson Three
Lesson Four