|
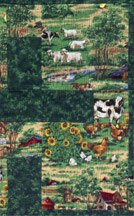
Cody's Quilt
(detail, right) was made as a "big brother" quilt for a new baby shower. The gift package included a small metal tractor and wagon and some plastic farm animals. This small quilt is a maze quilt with pictorial "farm" fabric forming the open areas and simple sashing blocks creating the "fences" and "gates". The original is a 6" block (cut size 6 ½"), with 2" sashings (cut width 2 ½") in a 5 x 5 layout plus a 2" border and binding to measure 43" x 43". You may make your quilt any dimensions you choose, but the directions below are for this size.
|

|
Cutting the fabric:
Print this page. Then, using your final layout plan as a guide, fill in the following chart as your record of blocks and sashing needed:
Number of background blocks__________ (Cut 6 1/2" from theme fabric)
Doorways: (Cut 2 1/2" square from theme fabric)
# _____ in vertical sashings
# _____ in horizontal sashings
Intersections: (cut 2 1/2" square from contrasting fabric)
#______
Contrasting sashing pieces to go with doorways (cut 2 1/2" x 4 1/2")
#______ (total of horizontal and vertical, unless this is a directional fabric)
Contrasting sashings (no door ways) (cut 2 1/2" x 6 1/2")
#______ vertical
#______ horizontal
Borders:
Horizontal ______" x 2 1/2" Cut TWO =______"
Vertical _______" x 2 1/2" Cut TWO =______"
Sewing the Sashings
If using a directional theme fabric, be sure to sew the sashings with the doorways oriented correctly.
Vertical Sashing:
![]() # ______doorway at top of strip
# ______doorway at top of strip
![]() # _____ doorway at bottom of strip
# _____ doorway at bottom of strip
Horizontal Sashing:
![]() # ______doorway at left end of strip
# ______doorway at left end of strip
![]() # _____ doorway at right end of strip
# _____ doorway at right end of strip
NOTE: If you are using a non-directional fabrics, you may construct one set of pieced sashing strips and rotate them to fit as needed.
Sewing the quilt
Use your design wall and pin up the blocks in position as you complete them. Re-arrange if needed.
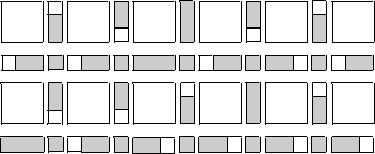
Sew together in strips of blocks plus sashing and in strips of sashing plus intersections as in the sample layout diagram below.

Sew the long strips together, matching seam lines carefully. Add the border fabrics (no need to miter.) If you need more help with completing the quilt, please ask in the discussion area and we will assist you.
For more layout ideas click here.
I hope you have enjoyed playing with mazes. I'm sure, now that you have thought about it, you will see more possibilities as time goes on--whether you intend to make another maze quilt or not.