Elegant Angel: Section B (head)

© 2000 Lily M. Kerns

         Section B

  1. Fasten a scrap of head fabric in position, right side up on the printed side of the pattern to cover Patch 1 generously and with at least a 1/4" seam allowance all around. Turn over and fold on the seam lines, one at a time, so you can trim to 1/4" seam allowance on 5 sides (The printed seam allowance is the 6th side.).

  2. Add Patches 1 through 5 from scraps of background fabric. Trim each to 1/4" from the fold of the paper on all sides before adding the next piece.

  3. Add Patches 6 and 7 from garment fabric. You may wish to make the grain of fabric in Patch 7 run horizontally.

  4. Patch 8 is a very small scrap of the background fabric. To save bulk, trim the seam allowance between Patches 7 and 8 to 1/8".


Section CD: Skirt

  Section C Section D

Section CD is made in two parts. You have three options:

Simple Paper Piecing:
  1. Make section C, following the directions for the previous sections.

  2. Make section D. Trim edges to the seam allowance. Press.

  3. Optional: Carefully remove the paper from the back of D. If the paper does not come loose easily, run the point of a seam ripper along the seam on the paper side to tear it. If the paper is not removed now, you will have two layers to remove later.

  4. Treat D as if it were a single piece of fabric. Position D along the edge of C so that it will flip to cover Patch 7. Be sure the wide seam allowances are matching. Press, flip and press. Pin if necessary to hold in position, then add a bit of basting around the outer edge or at corners, as you prefer. Section CD is now complete.


Using Overlay Fabric

(See below if using a scalloped edge lace) Use the same FPP directions as above, except that on patches where an overlay is to be included, it must be positioned first, with the underlying fabric added above it. The fabric to go under the lace may be background fabric (e.g. "transparent" wings) or it can match or contrast with the lace overlay. Experiment to see what will fit your materials best.

Place the lace on top of the previous patch, with the edge of the lace along the edge to be seamed, right sides together, and with a generous seam allowance for the area it is to cover when flipped into position. (illustration at right)

Position the underlay fabric, right side down, on top of and matching the lace edge. Sew the seam 1/4" from the edge. Press, flip, and press as usual. Because of the extra thickness, it will be wise to pin or baste to hold the double layer in place before adding the next section.
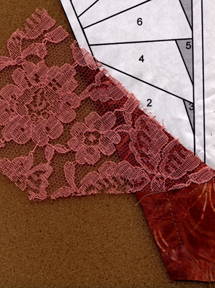
 

Using a Scalloped-edge Lace Fabric.

C D     CD

This requires several changes in procedure:

  1. C and D must be treated as one section. Tape or trace Section D in Patch C7. Trim the extra seam allowance from D where they would have been sewn together. Redraw the line between D1 and D2 so it is a continuation of C3-5 rather than offset (Patch 5 above, right).

  2. Cut the entire skirt area as one piece of background fabric or underlay fabric (Pieces C-1, 2,3 and D1). Be sure to include seam allowances. Baste into position at top and sides. Place this on a piece of cardboard or something you can pin into.

  3. Cut a strip of your scalloped edge lace that is at least two scallops wider than the lower edge of the skirt area and longer than the skirt length.

  4. Shape the lower edge of the lace to fit. Start with either the center of the middle scallop or the indentation between scallops as the center point. Stick a pin in this point, positioning the scalloped edge of the lace so it rests just above the seam line.

  5. Working one side at a time, place pins in the indentations, shaping the lace to fit the lower edge of the skirt area, staying just inside the seam line. The upper edge of the lace will no longer lie flat.

  6. Pleat the upper edge of the lace. Exactly how you do this will depend on your lace. You may or may not be able to pleat the entire width into the upper edge of the skirt area. Position the edge of each pleat to run to one of the indentations between scallops if possible. Your eye will tell you when the pleats are positioned to fit your lace. It may not work out symmetrically, so make it fit your fabrics. Lying smoothly is more important that actual positioning. Pin to hold in place.
    It is difficult to tell, without seeing the lace, that the lace in the scanned image above has a reversed box pleat in the center. Some lace was trimmed off at each side.

  7. Baste across the top on both sides of the seam line and again across the middle of the skirt. Trim extra fabric at outer edge of seam allowances on sides and top.

  8. Add the background fabric patches 3-6. Baste corners, if desired. Section CD is completed.


Elegant Angel Lesson One:

Introduction     Section A    Section EF

Patterns     Gallery   

Lesson 2