Elegant Angel: Section EF
© 2000 Lily M. Kerns
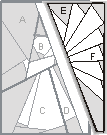
 F
F
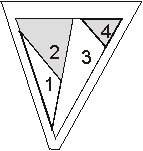 E
E
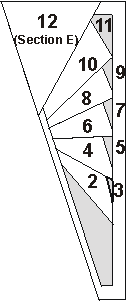
- Treat it as straight FPP, completing section E and adding it as Patch 12 to section F;
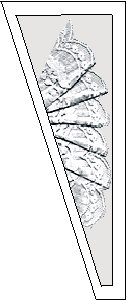
- Add a lace or sheer overlay to each wing patch;
- Consider the wing as a single solid area and add a scalloped lace overlay. (directions below)
Note for Section E: If you wish, Patch 1 can be treated as the reverse side of the other wing. In the image below, I will use the the reverse of the lace for that patch to create a subtle difference.
Optional: Scalloped Lace Overlay
- Trace Section E into Patch 12. Remove seam allowance where they would have been seamed.
- Cut background fabric to cover all of EF, plus seam allowances. Baste it to the pattern and place on a surface you can pin into.
- Cut a strip of lace along the scalloped edge that is approximately 1 1/2 to 2 times as long as the vertical dimension of F and wider than the top measure of F.
- Start at the top to shape the lace by pinning in the indentation of the scallops so that the edge of the lace stays approx 1/4" inside the seam line.
- You have two options here: If your lace is fairly heavy, shape the lace edge to be flat as you did on the skirt. With very fine lace, you can create a small (approximately 1/8" to 1/4") fold at each indentation, as in the example above.
At this point, ignore the paper piecing seam lines in the pattern, shaping the lace to curve down toward the skirt, and staying within the outside seam lines. Adjust the shaping if needed.
- Start in the center at the interior edge and begin to pleat out the extra fullness created in step 3-4. Use the seam lines in the pattern as a general guide for direction of the folds. If the folds don't want to lie flat, it may be necessary to lift the pin at the outer edge enough to release underlyingfabric.
- Baste the lace in place. You can appliqué the outer edge now if you wish. Trim all excess fabric
|
 |
Section EF is now completed.
In next week's lesson, I will give you some tips for joining the sections, removing the paper and completing the quilt as a small wall hanging or ??
Be sure to check the class Gallery for some more possibilities (all created in EQ4). Be prepared to share your ideas for other ways of using this small block in the discussion area.
Also next week: The paper sculpture angel (this pattern was made from a photograph of it) may be made as printed from your computer and stands about 4 1/2" high. If you wish to enlarge it, you will need to trace or print it to heavier paper.
Elegant Angel Lesson One:
Introduction
Section A
Section B,C,D
Patterns
Gallery
Lesson 2